Showing posts with label food. Show all posts

Wednesday, September 16, 2015

More New Doll Food!

Lately, all I've wanted to do is make doll food with sculpey clay. It's really fun! Here's my newest creation...

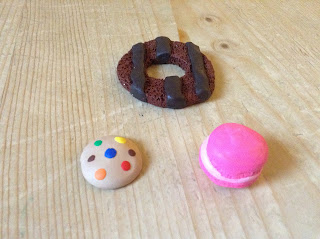
We have a chocolate cookie, a rainbow chocolate chip cookie, and a pretty pink macaron!

I made this using the instructions on Small Dolls In A Big World. Here's the link if you want to take a look! http://smalldollsinabigworld.com/crafts/craft-make-caramel-delight-cookies/ 
My cookie is really big....

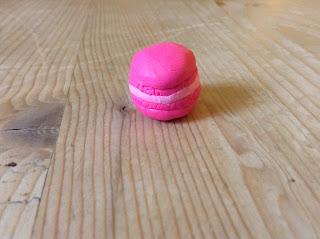
Next, is the pink Macaron! I love it because it's pink!

Last is the rainbow cookie! I like it a lot. :)

Remember the post about my burned doll clay food? Here is a picture of them.

The macarons turned gray..... And the donut is brown on the edges. ;)


What do you think? Which dessert do you like best? 


-American Girl Doll Crafter

Friday, August 28, 2015

My New Clay Doll Food

Lately, I've been making sculpey clay food for my dolls. I really enjoy it! So far I have made 3 pancakes, 2 slices of bacon, 2 crossiants, 1 egg, 10 blueberries,  1 donut, and 4 chocolate bars. Now, I have a few more things to add to my collection of clay food! Let's take a look...


This is my clay candy. Sadly, the orange lollipop broke when I was playing with it. :(  I made a swirly lollipop, 7 licorice sticks, 1 pink Popsicle, and a bag of doll M and M's. This is probably my favorite batch of food so far! Do you like them? What do you think I should make next? :)


-American Girl Doll Crafter 


Thursday, August 13, 2015

Doll Food Disaster!

You won't believe what happened a few days ago! Here's the story.


We had just bought a sculpey clay to make a craft for Maryellen Month. I didn't have much experience with clay, but after playing around with it for 2 days, I got the hang of it. :) I had just finished the MM craft and decided to make my dolls some french treats. They're so cute; 2 macarons and crossiants, 4 chocolate bars and a donut! I put them in the oven for 15 minutes at 275 degrees. But before the timer went off, we went to go run an errand. I totally forgot about my treats as I rushed out the door. My family and I were gone for 2 hours! On the way home, I shouted, "OH NO! I left my clay treats in the oven!" My mom drove as fast as she could towards home. Thankfully, our house wasn't in flames, but it smelled terrible! We took the treats out of the oven and let them cool outside. (They smelled that bad!) Surpisingly, they weren't burned. Just a little brown on the edges, but I could still use them.


I'm so thankful that our house isn't burned down and I've learned my lesson! From now on, I'm sitting right by the oven until my clay creations are done!


Have you ever had a disaster while making something for your doll?

-American Girl Doll Crafter

Monday, August 10, 2015

Craft- How to make Doll French Fries

I'm sorry, I was supposed to post this on Saturday, but I just got home from my vacation. ;) Im still going to post it, even though it's fashion week! Let's make some doll french fries!

Materials:

  • Yellow pipe cleaners
  • White card stock
  • Scissors
  • Ruler
  • Tape
  • Red marker


1. Cut a 5 by 1 1/2 inch strip of paper. This will be the fry box.

2. Fold both side so they meet equally in the middle.

3.  Then, fold about a 1/2 inch more so it has a 3D look.

4. Get your scissors and cut off half of the front of the fry box. Don't cut the sides; just to the first fold.

5. Tape the front together.

6. Cut out a small piece of card stock that will fit under your box. Tape it on.

7. To make fries, cut 1 1/2 inch strips of pipe cleaners. Put your fries in the box.
Then, decorate the box however you like!


This is my favorite retro diner food craft. What was yours?


-American Girl Doll Crafter


Saturday, August 8, 2015

Craft- How to make a Doll Burger

Next, we shall make the burger! (This craft has ALOT of clay in it, so cover your work surface when you need to use the clay.) 


Materials:


  • Large Paper Plate
  • Sculpey clay (I'm using the oven bake variety pack, but you will basically just need tan, brown, yellow and red) 
  • Modeling tools or a plastic knife
  • A crumply piece of tinfoil


1. Knead all your clay so it will be easy to work with. 

2. Divide your clay into 2 small balls. Take your first ball and press down on the sides so it looks like a dome. Get your second ball and smush it flat. Your hamburger buns should be almost the same size as a quarter.


3. Make a small ball out of  brown clay and smush it too! Then, mash it down on the crumply tinfoil.
For grill marks, use a black permanent marker and color lightly across the burger pattie.

4. Cut a small square out of your yellow clay. Dent the edges so it will look more realistic.


5. I don't know how to explain this, but I'll try! :) Using your red clay, make a thin random shape for ketchup.

6. Bake your burger in the oven. I set my temperature at 275, but you might want to follow the directions on your packet of clay.


Did you like this craft for MM? The French Fry craft is coming later tonight or tommorrow!


-American Girl Doll Crafter